12v Socket Fitting Guide

HOW TO: 12V lighter socket for GPS and Phone Charger

I love the classic look of my Yamaha SR400. At the same time however, I do appreciate some comforts modern technology offers. That’s why I decided to add a 12V lighter socket to my bike. It will keep my phone charged and enable me to bring along my (car) GPS on longer tours.

What you will need:

Materials

  • 12V cigarette lighter socket
  • Electrical connections (male and female)
  • An ON-OFF switch
  • 1m of electrical cabling (red and black)
  • Heat shrink to fit cabling and connections
  • Electrical tape

Tools

  • Electrical pliers
  • Electrical side cutters
  • Crimping tool
  • Soldiering iron

While a soldiering iron is not entirely necessary, I strongly advise to soldier all your connections. If you only put them together by twisting the wires together, they will oxidise over time (lowering the conductivity) and are easily subjected to loosening and breakage due to the bikes vibrations.

Also necessary is heat-shrink wrapping to keep dirt and water away from your connections and the ever helpful electrical tape (not in the picture).


Below are the metal connectors for the plastic plug (and socket). Soldier your positive and negative cables to them and put them in the plug (and socket). Obviously, ensure that the red wire connects to the red and the black to the black.


If you use the same connections, once you put the metal connectors in the plastic plug (or socket), you can’t take them out again. (see those little hooks?)

That second image is the connection that goes from the battery to the switch. The third image is the 12V lighter socket with GPS plug.


Solder your negative and positve wires onto the base of the socked as shown in this picture.

12v socket

Next, remove the negative battery connection to avoid accidental shorts.

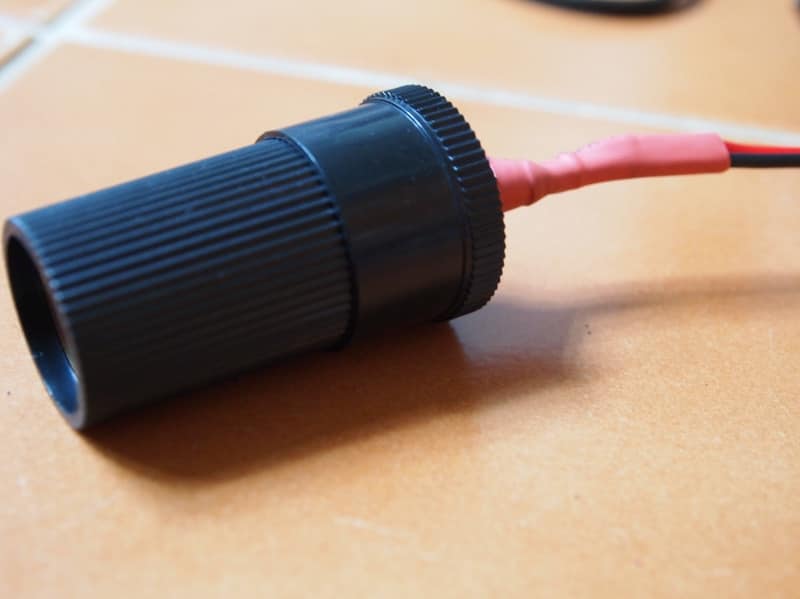
Cut those wires and add your connector to them. Soldier and isolate with electrical tape and/or heat-shrink tubes, as I said, I used both. I also used the white plastic connection pictured just because it gives me the freedom of a 12V outlet for other things in the future, should the need arise, but you can also do without it.

Then, drill a small hole in the toolbox opening and insert the switch.

Having a switch is sensible in my opinion, as I don't want to have power in the socket all the time. You never know if a lizard decides to go there and commit suicide, frying your battery at the same time.

The socket and the switch fit easily inside the toolbox. There’s still enough space for my emergency tools.

There's no visible alteration to the bike's aesthetic once the plastic side cover goes back.

And that's it! There are other guides, but this is a more simplified version specific to the SR, though with other bikes, the technique is much the same.

Select your currency
USD United States (US) dollar
THB Thai baht
Shopping cart0
There are no products in the cart!
Continue shopping
0

BLACK FRIDAY

sale

5% off EVERYTHING!

CODE: bkfri23